If you want to communicate more securely, encryption can be a good solution. For email, I use a tool called PGP, which stands for “pretty good privacy” and which relies on a system of “keys” to lock and unlock data. PGP does a good job of protecting the content of your messages, but using it isn’t exactly simple, especially for the average person.
I’ve gotten a few questions in the past several months from journalists and others who want to email in a more secure way but don’t yet know how to use PGP, so I figured I’d provide some basic instructions. If you have any further questions, please feel free to let me know.
Before you get started, a word of caution: Using encrypted email can protect the contents of your messages, but it doesn’t hide the fact that you were sending the message in the first place.
FOR PC USERS
Download and install GPG4Win
(1) Go to Gpg4win.org and click download. Click gpg4win 2.1.0 to start the correct download.
(2) The program should now be in your downloads folder as gpg4win-2.1.0.exe. Click or double click to run the program, and hit run.
(3) Click Next to install. The only default option you should change in this process is to install links on the desktop. Otherwise keep clicking Next.
(4) Check Root certificate defined or skip configuration, then click Next. Reboot the computer.
(5) Once the computer reboots, you’ll see icons that say GPA, Kleopatra and Gpg4win Documentation. We will be dealing only with the GPA, or GNU Privacy Assistant, so you can “recycle” those other items if you wish.
Set up your keys
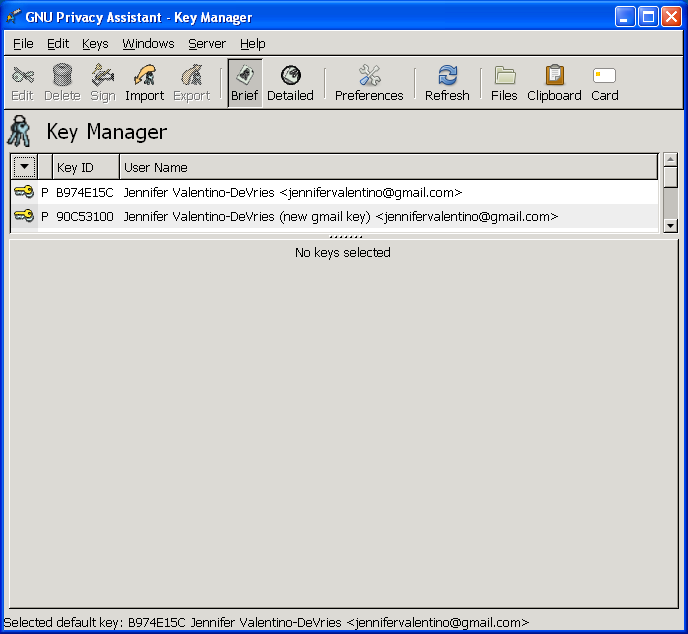
(1) Double click the GPA icon to open it. This is your “key manager.”
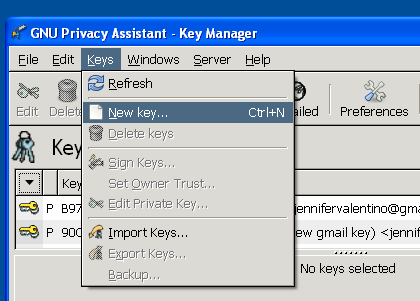
(2) The first thing we’ll do is create a new key. To do this, click on the Key menu and select New Key.
(3) Insert your name and click Forward. Then insert the email address with which you will associate this key and click Forward. Elect to make a backup copy of the key when prompted.
(4) You’ll then be asked to create the password you’ll use to access your key. Don’t use something silly such as “password” or “12345,” and don’t use a word you can find in the dictionary or an easy-to-guess series of numbers like your birthday.
Instead, use something memorable but hard to guess. I have several techniques, including thinking of phrases associated with my own childhood memories and then misspelling them or inserting other characters in them. Some more good ideas are here.
(5) While the key is being created, move your mouse around or type into another application. This helps the program create a better key. Don’t get worried if it takes a few minutes. Once the program has finished creating your key, you’ll see it in the main window.
(6) You’ll want to send the “public” version of your key out to a keyserver, so other people can find it. To do that, click on Server, then Send Keys. Sometimes it takes a while for your key to be sent, but don’t worry; it will get there.
(7) Now you’ll need to get the keys of the people you want to email. To retrieve keys, click on Server, then Retrieve Keys. You have to know the ID of the key you’re looking for; to get this, you can ask the person whose key you want.
However, I personally have had problems recently retrieving keys using GPA and the key server. Instead, it may be easier to import the keys of friends you want to email.
People can send you keys as files, or they might link to them online. My key is here. To save it as a file, right click and select “save as,” then save it to your desktop or downloads file. To import it into the GPA, select Import, then select the saved file and click “open.”
Start Encrypting
Now that you have keys, you’re ready to encrypt. Outlook integration is problematic, so I am going to walk you through encrypting text and files so that you can paste encrypted messages into any email program.
(1) If you click on the clipboard icon in the main window, it will bring up a window where you can type or paste text.
(2) Once you have put your message into the window, click “encrypt.”
Another window will pop up, where you can select the key of the recipient. Click OK.
(3) The message will be converted to encrypted text. You can paste this into the body of an email and send it.
(4) You can also encrypt entire files by clicking the “Files” button in the main window.
(5) If you are sending an encrypted email to someone for the first time, it’s polite to include your public key, so they don’t have to look for it on the key server. To do this, simply hit Export in the main window, choose a name for your key, and click save. Then attach that file to the email you are sending.
Decrypt
To decrypt messages using GPA, simply copy and paste the full encrypted message into the clipboard, and click “decrypt.”
FOR MAC USERS
Download and Install GPGTools
(1) Download GPGTools by clicking the “Download” button here.
(2) Open the .dmg file that is saved onto your machine. (It will probably be in your Downloads folder, depending on your settings.)
(3) Click on GPGTools.mpkg to run the installer. Just keep clicking “continue” to install the program.
Set Up Your Keys
(1) Your Applications folder should now contain a program called GPG Keychain Access. Start that program.
(2) First, you’ll want to create your own PGP key. Click on the key icon labeled “new” at the top left of the GPG Keychain Access window.

(3) Fill out the form with the name and email address you want to use. Using the drop-down menu, change the length to 4096. Choose an expiration date a year from now. Click “Generate Key.”
(4) A window will pop up asking you for a password. This is where you make up the password you’ll use to access your key. Don’t use something silly such as “password” or “12345,” and don’t use a word you can find in the dictionary or an easy-to-guess series of numbers like your birthday.
Instead, use something memorable but hard to guess. I have several techniques, including thinking of phrases associated with my own childhood memories and then misspelling them or inserting other characters in them. Some more good ideas are here.
(5) Enter the password again to confirm it.
(6) While the key is being created, move your mouse around or type into another application. This helps the program create a better key. Don’t get worried if it takes a few minutes. Once the program has finished creating your key, you’ll see it in the main window.
(7) You’ll want to send the “public” version of your key out to a keyserver, so other people can find it. To do that, highlight your key, go to the Key menu and select “send to keyserver.” Sometimes it takes a while for your key to be sent, but don’t worry; it will get there.
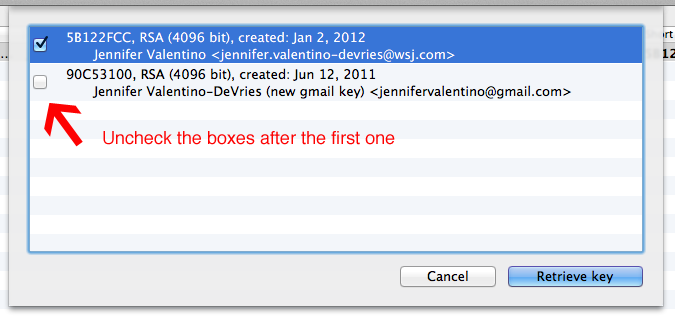
(8) Now you’ll need to get the keys of the people you want to email. In the “Key” menu, select “Search for Key” and search for the name or email address of the person you want to contact. Generally, you should select only the most recent key, which will appear at the top of the list. This means you’ll need to uncheck the other keys; otherwise they will all be retrieved. Click “Retrieve Key” when you’re finished.
If someone has given you their public key as a file, you can import it by selecting the icon that says “Import” and selecting the file from your computer.
The person’s “public key” will now show up in your list, along with your own key.
Start Encrypting
Now you’re ready to encrypt! There are two main ways to do this, and I’ll outline both below. The first option is more straightforward for most users. The second option allows you to encrypt documents and other text, not just emails.
Using the Mac Email Program
(1) To use the Mac Email program with GPGMail, you must be using the email address that you have associated with your key. If that is the case, simply start up or restart your email program. GPGMail should have been integrated automatically.
(2) To send an encrypted message, type the name of a recipient whose key you have. You will see a little “lock” icon near the top right of the message pane. Set it in the “locked” position; your email will be encrypted.
Using OpenPGP Services (Works With Any Email, Not Just Mac Mail)
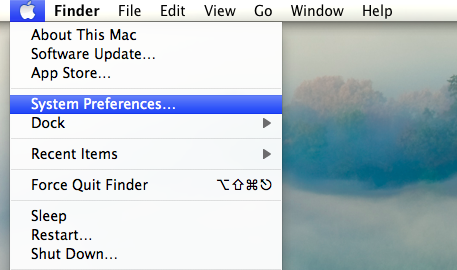
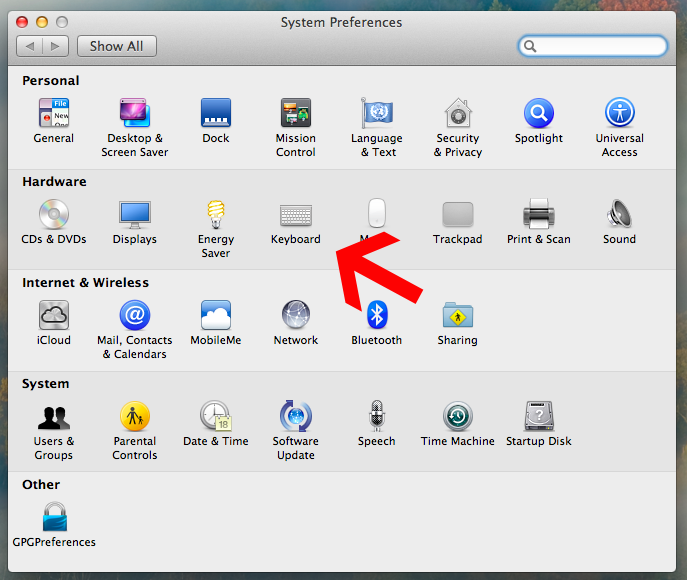
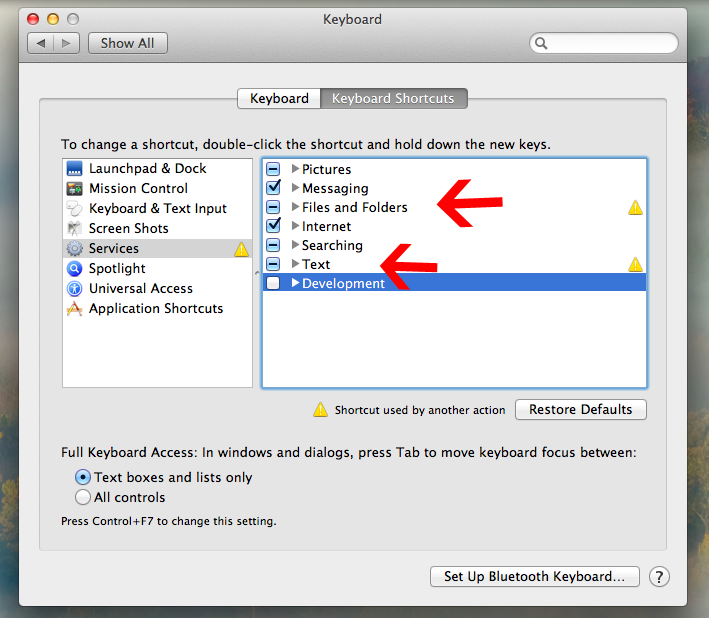
(1) You’ll need to set up your system to encrypt and decrypt text and files. To do this, go to the Apple menu and select System Preferences. Select the Keyboard icon and then click on Keyboard Shortcuts. In the left column, select Services.
On the right, you’ll see two sets of possible selections that start with “OpenPGP.” One will be under the “Files and Folders” section, while the other will be under “Text.” Make sure everything that starts with “OpenPGP” is selected on both sections. (Don’t worry if it tells you the shortcut is already used by another action. Just ignore that.) Then close out that window.
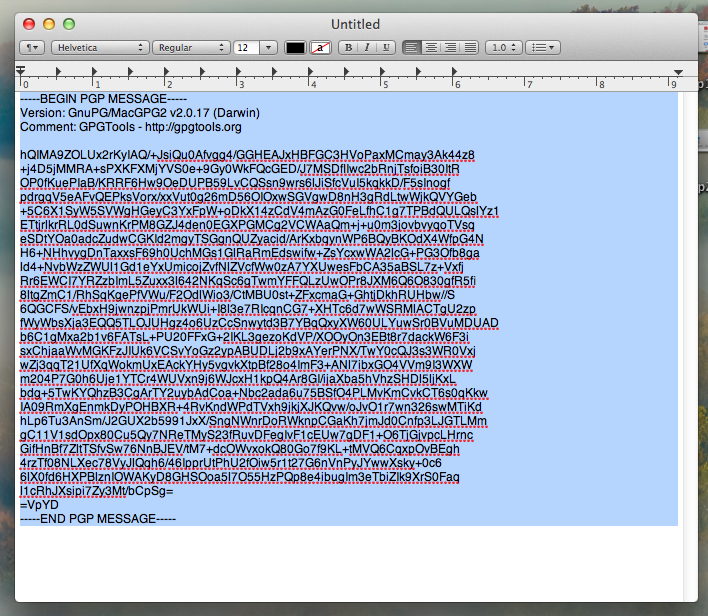
(2) Open up TextEdit or a word processing program and type a message. Once you’ve typed the message, select the text. Then go to the TextEdit menu (or the Microsoft Word menu, depending on which program you’re using) and hover over Services. Select OpenPGP:Encrypt. Check the name of your recipient, and then click “OK.”
(3) The program will convert your message into encrypted text. You can cut and paste that entire block (including the parts that say Begin PGP Message and End PGP Message) into whatever email program you use.
(4) One last thing to keep in mind: Make sure your recipient can find your public key, in case a response is required. You can do this by including your information in your original message, so your key can be found on the keyserver. Or you can go back to GPG Keychain Access, click on the “Export” key icon and save your public key as an ASCII file. This file can be attached to your email.
Decrypt
If you receive an encrypted email, you’ll need to decrypt it to read it. If you’re using Mac Mail, you’ll see options to do this when you get an encrypted message. If you’re using OpenPGP Services, simply select the entire block of encyrpted text, go to Services in the program drop-down and select OpenPGP:Decrypt.






The most simple and clear cut explanation of the PGP/GPG ever.
Excellent work thank you..
I am thinking we all need to really work on our friends.. Get them to user Encryption in their mails.. make it the thing to do.. In the end it serves as an enormous benefit to our First Amendment Rights and our Rights to Freedom of Thought.
Vic
Great guide. Keep it up.
I agree with Vic – the big issue is general user security education and the adoption of signing and encryption for all/every email (and all other communication channels where possible).
Good security (and privacy) needs to built in to products and configured by default – until then we all need to use add-ons and adopt practices to make them secure.
Every security aware user needs to help educate and support family, friends and colleagues in the use of this technology too.
Security awareness and good security practice needs to become fashionable & mainstream.
I have found another easy way to encrypt your emails. You have just to install the plugin gpg4o to Outlook 2010 or Outlook 2013. Here you can see more informations: http://www.giepa.de/produkte/gpg4o/
Editors Note: I haven’t tried this product so can’t recommend it myself. Nor have I seen any security reviews of it. (Most of the information seems to be in German.) If any commenters have experience with it, I’d love to hear about it. — Jen
[…] Finally, I have written up some instructions for my favorite encrypted communication tool, OTR messaging. You can find them here. And you can check out my earlier post on PGP encryption for email and other text here. […]
A detailed description of a difficult process.
I can do it. but I have no one who can to talk to this way.